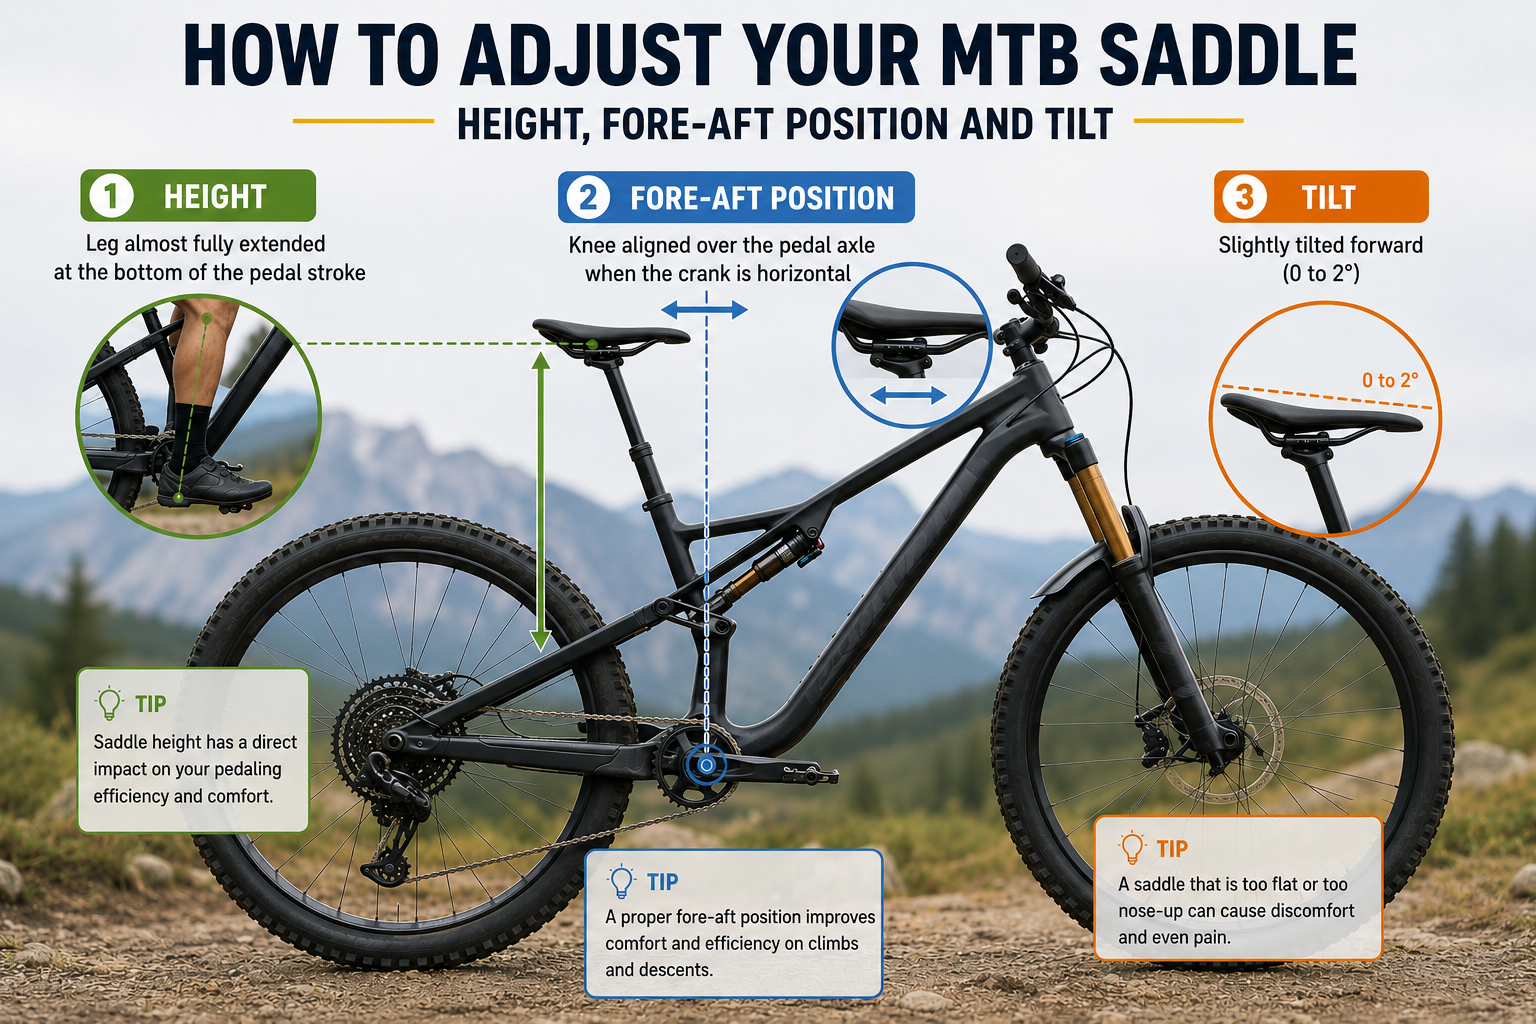
A poorly set up saddle is one of the leading causes of pain, numbness and lost pedalling efficiency on a mountain bike — well before the saddle model itself becomes an issue. The good news: getting the height, setback and tilt of your saddle right only takes a few minutes and minimal tools. This guide walks you through setting up your MTB saddle to match your body and your riding style.
Browse our full range of MTB saddles in stock, as well as our seatposts and seatpost clamps to complete your setup.
1. Why setting up your MTB saddle correctly matters
Saddle setup directly affects three things:
- Comfort: a saddle that's too high, too low or badly tilted creates pressure points, lower back pain or numbness in the perineal area.
- Performance: incorrect height or setback reduces pedalling efficiency and costs you power, especially on climbs.
- Safety: on a mountain bike, saddle position relative to the frame affects your balance on descents and how quickly you can drop it out of the way on technical sections.
A good MTB saddle setup therefore comes down to three adjustments: height, setback (fore/aft position) and tilt.
2. Setting saddle height
This is the best-known adjustment, but also the one most often neglected once the initial position has been found.
Practical method: get on your bike (against a wall or held by someone), place the pedal at the bottom of the stroke and rest your heel on it. Your leg should be almost fully extended. Then switch back to your normal riding position (ball of the foot on the pedal): your knee should form an angle of roughly 25 to 30° at the bottom of the pedal stroke. This is the most reliable reference point for efficient pedalling without overextending the knee.
A simple visual check if you don't have anyone to help: at the bottom of the pedal stroke, your leg should be nearly straight, with only a very slight bend — never a fully locked leg, nor a knee that stays bent.
On Enduro or Downhill bikes, where you regularly need to drop the saddle for technical sections, a dropper post lets you adjust height on the fly from the handlebar, without having to stop and get off the bike.
3. Setting saddle setback (fore/aft position)
Setback is the horizontal distance between the bottom bracket axle and the nose of the saddle. It's an adjustment that's often overlooked, even though it has a direct impact on your position and pedalling efficiency.
The plumb-line method: sit on your bike in your normal pedalling position, with the pedals horizontal (3 o'clock/9 o'clock). A plumb line held at the front of your knee should fall exactly through the centre of the front pedal axle. If the line falls in front of the axle, the saddle is too far back; if it falls behind, it's too far forward.
This adjustment is made by slightly loosening the saddle clamp underneath the saddle (the cradle), sliding the saddle along the rails, then retightening firmly.
For powerful riders or those focused on descending: if you need more setback than your saddle's cradle allows, an MTB seatpost with setback is a suitable solution — it shifts the saddle mounting point further back relative to the post's axis, giving you a more rearward position without compromising comfort.
4. Setback by riding style: XC, All Mountain, Enduro/DH
The ideal setback isn't the same for every discipline. The table below gives starting points to fine-tune according to your body and how it feels on the trail:
| Riding style | Setback | Tilt |
|---|---|---|
| Cross-country (XC) | Moderate to low, forward position for efficient pedalling | Nearly flat, to avoid sliding forward when accelerating |
| All Mountain / Trail | Standard, balanced climbing/descending position | Neutral, very slightly tilted if needed |
| Enduro / Downhill (DH) | More pronounced, as the saddle plays a secondary role in pure pedalling | Nose slightly tilted down to help the saddle slide behind you |
In Cross-Country, riders look for a forward position and efficient pedalling, particularly on climbs. In Enduro and Downhill, more setback and a saddle that's easier to get behind while riding are generally preferred.
5. Setting saddle tilt
Once height and setback are set, the last adjustment is the saddle's angle.
The basic rule: a near-neutral position (perfectly horizontal, or with a very slight angle) suits most riding styles. In Enduro and Downhill, a nose tilted slightly downward can make it easier to get behind the saddle while riding. In Cross-Country, a nearly flat saddle is generally preferred.
Common mistakes: a nose tilted too far up increases pressure on the perineal area and can cause numbness. A nose tilted too far down makes you constantly slide forward on the saddle, putting extra strain on your arms and hands.
6. Tools and installation method
An Allen key (the size depends on your clamp model) is enough in most cases to adjust height, setback and tilt. Work through these steps in order:
- Height: loosen the seatpost clamp on the frame, adjust the height, retighten to the recommended torque.
- Setback: loosen the clamp under the saddle, slide the cradle along the rails, retighten.
- Tilt: adjust the angle before final tightening of the clamp under the saddle.
For a precise, repeatable setup, measure the setback you've achieved (horizontal distance between the seatpost axis and the nose of the saddle) and write it down, so you can reproduce the position if you ever remove the saddle or switch bikes. A torque wrench is recommended to respect the correct tightening torque, especially with carbon rails.
7. Common setup mistakes to avoid
- Setting the height once and never checking it again after changing shoes, pedals or seatpost.
- Forgetting to re-check setback after changing your seatpost or saddle (the mounting point on the rails can differ).
- Tightening the saddle clamp without respecting the specified torque: too loose and the saddle will gradually slip during a ride; too tight and you risk damaging the rails, particularly carbon ones.
- Copying another rider's setup without accounting for your own body and riding style.