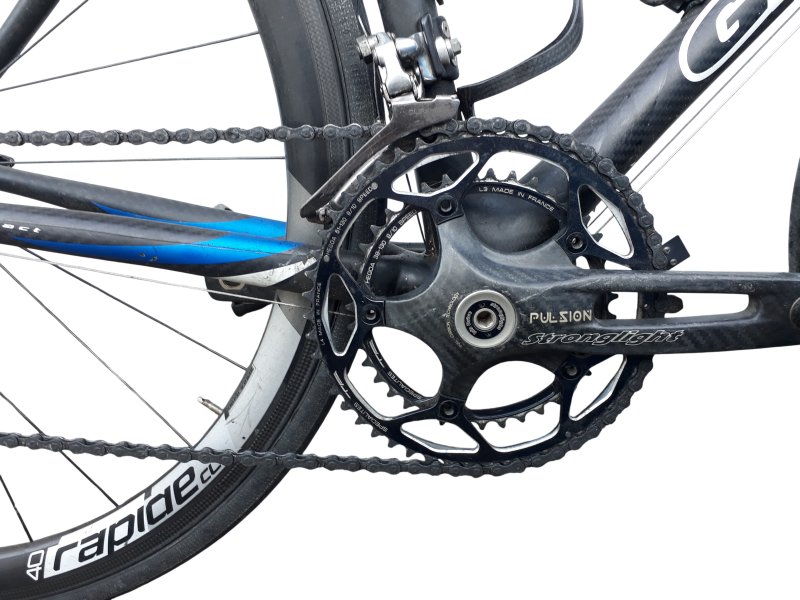
Your chain occasionally skips under load, or you hear an unusual clicking noise while pedaling—is your road bike chainring to blame? The chainring is one of the least inspected components on a bicycle, yet a worn chainring reduces pedaling efficiency, accelerates chain wear, and can cause unexpected chain skips during hard efforts.
This guide gives you everything you need to diagnose chainring wear in less than 5 minutes: the four visual signs to look for, three functional tests you can perform without removing any parts, an estimated lifespan table based on material, and how to distinguish actual wear from a simple drivetrain adjustment issue.
1. Why inspect your chainrings regularly?
A worn chainring doesn't just make pedaling less enjoyable—it starts a vicious cycle whose final cost is much higher than replacing the chainring before it fails.
- A worn chainring wears out the chain faster. Hooked teeth grip the chain links unevenly and gradually deform them. A brand-new chain installed on a heavily worn chainring may stretch prematurely after only 1,000 to 1,500 km instead of the usual 2,000 to 3,000 km.
- A worn chain wears out the chainring faster. As the chain elongates, its engagement angle with the teeth changes, accelerating uneven tooth wear. Both components gradually damage each other.
- Chain skipping happens without warning. Unlike a puncture, chainring wear develops silently until the chain suddenly skips while climbing or accelerating.
Practical tip: inspect your chainrings every time you replace your chain (approximately every 2,000 to 3,000 km). A quick two-minute inspection is enough to detect about 90% of advanced wear before it causes real problems.
2. The 4 visual signs of a worn chainring
Position yourself at chainring level, preferably with side lighting, and inspect the following points in order.
Hook-shaped or shark-fin teeth
What you'll see: look at the teeth from the side at eye level. On a new chainring, the teeth are symmetrical and pointed, with identical profiles on both sides. On a worn chainring, the teeth become asymmetrical: the leading edge (the side that first contacts the chain during rotation) becomes nearly vertical, while the trailing edge develops a smooth slope. The tooth leans in the direction of chain rotation, creating the classic "shark fin" or "hook" profile.
How to assess it: if you notice this hook-shaped profile on three consecutive teeth or more, it's time to replace the chainring. One or two isolated teeth may simply have been damaged by an impact, so inspect the entire chainring before reaching a conclusion.
Severity: 🔴 Critical — replace the chainring as soon as possible.
.jpg)
Symmetrical, pointed profile — both sides of the tooth are identical.
_1.jpg)
Asymmetrical hook-shaped profile — the leading edge is vertical while the trailing edge slopes backward.
Worn or missing shift ramps and shift pins
What you'll see: on a new chainring, look between certain teeth and you'll notice small machined ramps or raised areas known as shift ramps and shift pins. These features guide the chain during front shifting between the small and large chainrings, allowing fast and quiet gear changes even under light pedaling load.
When they're worn: the ramps gradually disappear. Front shifting becomes slower, hesitant, or fails completely—even if the front derailleur is perfectly adjusted and the cable is new. Reducing pedaling pressure may improve shifting slightly, but it never regains its original smoothness.
Severity: 🔴 Critical — directly affects shifting performance.
Reduced tooth height
What you'll see: compare your chainring with a new chainring of the same tooth count (or one you rarely use). On a worn chainring, the teeth become shorter and flatter. Chain engagement becomes less effective because the links no longer fit properly between the teeth.
Warning threshold: once the teeth have lost more than one-third of their original height, the chainring should be replaced. In practice, this usually appears together with hooked teeth—if you notice one sign, look carefully for the other.
Severity: 🟡 Moderate — accelerates chain wear and should be monitored closely.
Uneven tooth wear
What you'll see: some teeth wear faster than others depending on their position relative to the shifting ramps. While inspecting the entire chainring, you may notice that a few teeth are heavily worn (with a pronounced hook profile), whereas others on the opposite side still appear almost new.
How to interpret it: even if most of the teeth look acceptable, severe localized wear affecting just four to six consecutive teeth is enough to cause chain skipping in those specific areas. The chain naturally engages these worn sections during gear changes, creating intermittent skipping that's often difficult to diagnose.
Severity: 🟡 Moderate — may cause occasional chain skipping that's difficult to identify.
3. Three functional tests you can do yourself
If a visual inspection is not enough to make a decision—or if you want additional confirmation—these three practical tests will help you determine whether your chainring is worn without removing it.
🔧 Test 1 — The manual pull test (30 seconds)
- Place the bike on a repair stand or turn it upside down, resting on the saddle and handlebars.
- Shift onto the large chainring and a middle cassette sprocket.
- Grip the chain on the lower section (between the chainring and the chain guide) and pull it straight away from the chainring, toward you.
- Observe whether the chain lifts enough to expose the base of the chainring teeth.
🚴 Test 2 — The load test while riding
- Ride using the large chainring and a middle cassette sprocket.
- Climb a short hill or accelerate hard on flat terrain.
- Maintain steady pressure on the pedals—do not ease off.
- Pay attention to whether the chain skips (one or two pedal strokes with no drive).
📏 Test 3 — Check chain wear
- Use a chain wear gauge (Park Tool CC-3.2, Shimano TL-CN42, or an equivalent model).
- Insert the tool between the links on the upper section of the chain.
- Read the wear measurement indicated by the tool.
Tip: A chain wear gauge costs between $10 and $25 and can save you many times its price by preventing components from being replaced either too early or too late. It is one of the best maintenance investments for any regular cyclist.
4. Large vs. small chainring: which wears out first ?
The two chainrings on a double crankset do not wear at the same rate. Understanding this difference helps you schedule replacements more efficiently.
| Criteria | Large Chainring (50 or 52T) | Small Chainring (34 or 39T) |
|---|---|---|
| Main Use | Flat roads and descents — used almost continuously | Climbing and low-speed riding — used occasionally |
| Wear Rate | Wears 2–3× faster than the small chainring | Slow wear — typically lasts 2–3× longer |
| Main Wear Indicator | Hook-shaped teeth + worn shift ramps | Hook-shaped teeth (appears later) |
| Replacement Guideline | Replace every second chain replacement | Inspect with every chain replacement and replace if worn |
In practice, if you replace your chain every 2,500 km (1,550 miles), inspect the large chainring each time and expect to replace it every 5,000–7,500 km (3,100–4,650 miles), depending on the material. With proper maintenance, the small chainring can often remain in service for 15,000–20,000 km (9,300–12,400 miles).
5. Typical chainring lifespan by material and maintenance
The lifespan of a chainring mainly depends on two factors: its material and how consistently the chain is maintained. The table below provides typical mileage ranges for the large chainring under normal road cycling conditions.
| Material | Examples | Regular Maintenance | Minimal Maintenance | Main Factor Reducing Lifespan |
|---|---|---|---|---|
| 6061 Aluminum | Shimano 105, SRAM Rival | 8,000–12,000 km | 5,000–8,000 km | Never replacing the chain: −50% |
| 7075 CNC Aluminum | Shimano Ultegra, TA Specialties, Stronglight | 15,000–22,000 km | 10,000–15,000 km | Riding in wet conditions without cleaning: −30% |
| Premium 7075 Aluminum | Shimano Dura-Ace, Rotor Q-Rings | 18,000–25,000 km | 12,000–18,000 km | Insufficient lubrication: −25% |
| Carbon | Dura-Ace Carbon, Osymetric | 15,000–20,000 km | 10,000–15,000 km | Impacts or crashes may weaken the structure |
Mileage estimates apply to the large chainring under standard road riding conditions. The small chainring typically lasts 2–3× longer. The green row represents the best balance between durability and value.
Key takeaway: Replacing your chain regularly (every 2,000–3,000 km / 1,250–1,860 miles) can double the lifespan of your chainring. Conversely, continuing to ride with a chain that has stretched beyond 1% can wear out a brand-new chainring in just a few hundred kilometers.
6. False positives: what looks like a worn chainring (but isn't)
Several symptoms can perfectly mimic a worn chainring even though they are actually caused by poor adjustment or another drivetrain component. Before ordering a replacement chainring, check the following:
| Symptom | Possible Cause (Not Chainring Wear) | How to Check |
|---|---|---|
| Rubbing noise while pedaling | Front derailleur incorrectly adjusted (cage too close to the chainring) | Adjust the front derailleur's high and low limit screws. If the noise disappears, the issue was adjustment—not chainring wear. |
| Occasional chain skipping | Rear derailleur cable has stretched or the housing is dirty | Re-tension the cable or lubricate/replace the housing. Test again. If the skipping disappears, the cable was the problem. |
| Slow or missed front shifts | Worn front derailleur cable or insufficient cable tension | Replace the front derailleur cable and housing. If shifting becomes smooth again, the cable was at fault. |
| Irregular clicking noise | Quick link not fully engaged or a stiff chain link | Inspect the chain link by link. A stiff or improperly closed quick link can make the exact same noise as a worn chainring. |
| Heavy or resistant pedaling | Worn or poorly lubricated bottom bracket | Check crank rotation with the chain removed. A worn bottom bracket will rotate with noticeable resistance or side-to-side play. |
Warning: A front derailleur that gradually goes out of adjustment can rub against the chainring for hundreds of miles without the rider noticing. This constant rubbing accelerates localized wear on the sides of the teeth and is often mistaken for normal mechanical wear. Check your derailleur adjustment at the beginning of every riding season.
7. What should you do once the diagnosis is confirmed ?
Your diagnosis is complete—your chainring is worn. Here are the next two logical steps:
- Prepare for replacement. Identify your crankset's BCD (Bolt Circle Diameter), usually engraved on the crank arm or measurable manually, along with the number of speeds in your drivetrain. These two pieces of information are essential for choosing the correct replacement chainring. Our guide Road bike chainring BCD guide explains how to identify both in just two minutes.
- Replace the chainring. Our complete guide How and when to replace a road bike chainring walks you through every step, including the required tools and important installation tips.
Don't forget to inspect your chain at the same time. If it has covered more than 2,000 km (1,250 miles) with the worn chainring, replace both components together to prevent premature wear of the new chainring.
8. FAQ — Road bike chainring wear
How many miles does a road bike chainring typically last?