Over time, bike shifters can wear out, become imprecise, or even break. If you're noticing excessive play, inconsistent gear changes, or mechanical failure, it may be time to change your road bike shifter. While it might seem like a complex task, replacing your gear lever is manageable with the right tools and a bit of know-how.
In this guide, we explain how to change a road bike shifter, what specs you need to check, and the main differences between shifter types depending on the brand and bike setup.
Why change a road bike shifter ?
The shifter (or gear control lever) is a key component of your bike’s drivetrain system. It allows you to manage your gear selection by operating the front and rear derailleurs. You may need to replace your shifter for several reasons:
-
Mechanical wear or failure
-
Broken cable or spring
-
Upgrading or replacing the drivetrain
-
Switching to a modern system (e.g., integrated brake/shift levers)
-
Changing the number of speeds (e.g., from 9-speed to 11-speed)
Key features of road bike shifters
Before buying a new shifter, you’ll want to verify the following:
1. Drivetrain compatibility
Each shifter is designed to work with a specific number of gears: 8, 9, 10, 11, or even 12 speeds. It must match your rear derailleur and cassette.
2. Brand and gear ratio
Drivetrain brands like Shimano, SRAM, and Campagnolo use different cable pull ratios, meaning you should stick with the same brand unless you're replacing the full group.
3. Integrated shifter type
Modern road bikes use integrated brake/shift levers:
-
Shimano STI
-
SRAM DoubleTap
-
Campagnolo Ergopower
These dual-control levers manage both braking and shifting.
4. Internal vs. external cable routing
Some newer bikes have internal cable routing, requiring compatible shifters and attention to cable integration in the handlebar or frame.
Tools and materials needed
-
Allen keys
-
Cable cutters (bike-specific)
-
Phillips or flat screwdriver (depending on model)
-
New bar tape (if removed)
-
New gear cables and housings (recommended)
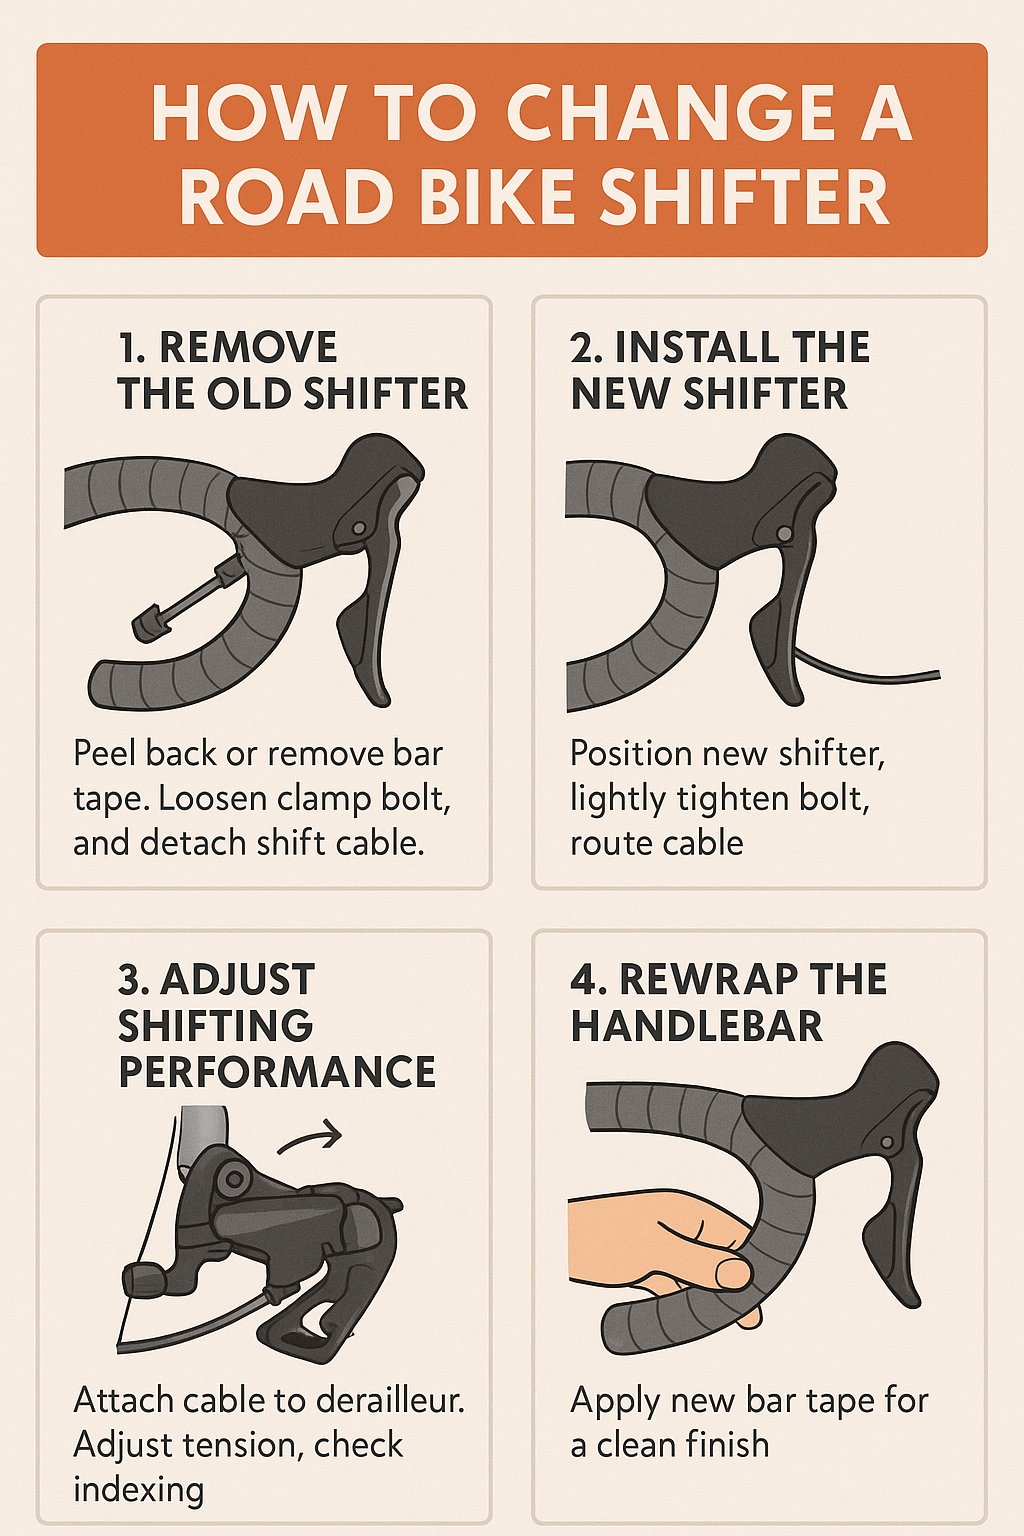
How to change a road bike shifter – step by step
1. Remove the old shifter
-
Peel back or remove your handlebar tape.
-
Loosen the clamp bolt holding the shifter to the handlebar.
-
Detach the shift cable from the derailleur.
2. Install the new shifter
-
Position the new gear shifter at the correct height.
-
Lightly tighten the clamp bolt for adjustment.
-
Route the new cable through the shifter and housing.
3. Adjust shifting performance
-
Attach the cable to the derailleur.
-
Adjust cable tension for smooth, accurate shifting.
-
Check indexing and limit screw settings.
4. Re-wrap the handlebar
-
Once everything is properly installed and adjusted, reapply new handlebar tape for a clean finish.
Pro tips
-
Always replace the cable and housing when installing a new shifter.
-
On most road bikes, the right shifter controls the rear derailleur, the left one controls the front.
-
On vintage or retro bikes, make sure to check compatibility with friction shifters or non-indexed systems.
-
If you’re replacing the brakes too, check the brake pull ratio (short vs. long pull) based on your calipers.
Conclusion
Knowing how to change a road bike shifter is a valuable skill that can restore precise, smooth gear changes and breathe new life into your ride. Whether you're replacing a worn-out component or upgrading to a modern drivetrain, choosing the right gear lever is crucial for reliable shifting.