Tutorial: Removing and Replacing the XC MTB Stem
Necessary tools :
- Allen wrench
- Torque wrench
- Adjustable wrench or flat wrench
- Bicycle grease
Precautions before starting:
- Make sure your MTB is securely mounted in a rack or repair stand.
- Wear protective gloves to avoid any risk of injury.
- Check the compatibility of the new stem with your handlebars and fork.
Step 1: Removal of the Existing Stem
1. Remove the handlebar plugs: Use an Allen wrench to remove the handlebar plugs from the handlebar ends.
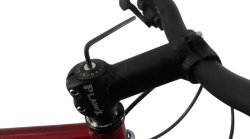
2. Loosen the MTB stem clamp screws: Use the Allen wrench to loosen the clamp screws located on the top of the stem. These screws hold the stem attached to the fork.
3. Remove the stem: Once the screws are loosened, the stem should come free. Slide the stem off the fork.
4. Removing the handlebars: If you are also replacing the handlebars, unscrew the stem clamps to release the handlebars.
Step 2: Preparing the New Stem
1. Apply grease: Put a thin layer of grease on the contact areas between the new stem and fork to ease installation and prevent corrosion.
2. Place the new stem: Insert the new stem into the fork, align it correctly with the front wheel, then lightly tighten the clamp screws to hold the stem in place.
3. Reinstall the handlebars: If you removed the handlebars, place them back into the new stem and adjust the angle to your preference.
Step 3: Properly Tightening the Stem and Handlebars
1. Tightening the stem: Use the torque wrench to gradually tighten the stem clamping screws, respecting the tightening torque recommended by the manufacturer. This prevents damage to the fork and ensures secure attachment.
2. Tightening the handlebars: If you have removed the handlebars, tighten the stem clamps using the torque wrench, also respecting the recommended tightening torque.
3. Reinstall the handlebar plugs: Once the stem and handlebars are secure, replace the handlebar plugs.
Step 4: Final Verification
1. Check alignment: Make sure the handlebars are aligned correctly with the front wheel and the stem is tight.
2. Do a test drive: Before heading out for a ride, do a short test drive to make sure everything is in order.
Congratulations, you have now successfully removed and replaced the stem on your XC mountain bike !
We offer a large number of second-hand and new xc MTB stems from stock.